Composting
Reducing Chemical Use
Maintaining Your Landscape
–Mowing
—-Reducing Reliance on Power Tools
–Pruning & Trimming

Composting
Reducing Chemical Use
Maintaining Your Landscape
–Mowing
—-Reducing Reliance on Power Tools
–Pruning & Trimming
As mowing season gets into full swing, we should consider the negative impacts of power garden tools on our environment as they pollute the air with exhaust, CO2 and noise!
I recently attended a lecture by acoustic ecologist, Gordon Hempton. The summary on the back cover of his book begins: “In the visionary tradition of Rachel Carson’s Silent Spring, One Square Inch of Silence alerts us to the beauty that we take for granted and sounds an urgent environmental alarm. Natural silence is our nation’s fastest-disappearing resource.” His lecture included recordings of the dawn chorus of songbirds; symphonies of frogs; water dripping, trickling, and thundering; and the amazing, deep vibrational hum of a hollow Sitka Spruce log being pounded by ocean waves.
Garden designers are often inspired by what they’ve seen (and heard) in natural places and attempt to recreate their experience. Along with appearance, we often consider fragrance and taste (when growing food) in our gardens, but motion, sound, and tactile sensations are design elements that are often overlooked in creating a beautiful garden.
I was reminded how, when I worked at Wright Park in Tacoma, the constant hum of leaf blowers in fall severely diminished my enjoyment of my otherwise favorite chrysanthemum floral display.
Lawnmowers, spin trimmers, edgers, leaf blowers have become standard tools for landscapers. All of which are used to keep lawns neat and tidy. I often encourage people to reduce or eliminate their lawns and replace them with native groundcovers if their only purpose is for aesthetics, especially in areas where no one will be walking (such as street medians!). A higher initial investment in time and money for planting and weeding may be required until groundcovers are well established. But I feel this is preferred over the time and energy it costs to mow turfgrass every week in the growing season. I have never used power hedge shears and also discourage planting hedges that require shearing.
It would be great if we didn’t have to use any power tools at all! Lawns, however, do make a nice play surface, and for people who have acreage, mowing is the easiest way of keeping down tall grass (making it easier to walk around) and for controlling blackberries and Scotch Broom. By planting eco-lawns, and not being so fussy, you might be able to get away with mowing only a few times a season.
Recently, while buying a new lawnmower, my husband and I debated the virtues of different models. I originally had thought to get the wimpy corded electric model. I really like my corded electric spin-trimmer. I don’t have to worry about messy gas or oil, being able to pull-start it, or batteries dying. Being a “Tim Taylor (Hoh, Hoh, Hoh),” power-tool kind of guy, he convinced me to get the more powerful, battery-powered mower. He was concerned that a corded electric mower would be too big of a draw on the batteries that store the power for our solar home. But after only a year or to the battery died so either I need to get a new battery or a different mower.
Small, gasoline powered tools, especially two cycle engines, which require you to mix oil with the gas, tend to be very noisy and are the most polluting. Electric power tools are much cleaner and tend to be quieter. Newer models are also more powerful.
For that next garden chore, decide whether it is really necessary to use a power tool. Old fashioned hand tools: rakes, hoes, hand cultivators, shovels, loppers, pruning saws, hand shears and a wheelbarrow are much more peaceful to use. Your neighbors may thank you!
(This article was first published in the Peninsula Gateway on May 26, 2010)
Invasive plants are non-native plants that negatively impact the natural ecology of an area by outcompeting native plants. Their presence affects the entire food web by depriving insects and other animals of food, cover and nesting sites normally provided by displaced native plants. Invasive plants may also adversely affect agriculture and other businesses important to our economy; as well as mar the beauty of our parks and natural areas.
People are the main dispersers of plants; plants are often introduced unknowingly as unnoticed seeds on shoes, clothing or baggage. Many are introduced purposefully for use as food, culinary or medicinal herbs, construction materials, or garden ornamentals.
The first line of defense against invasive species is education and prevention. The USDA, Animal and Plant Health Inspection Service (APHIS) conducts inspections at marine ports, border crossings and airports to prevent the introduction of pests, (insects, plant diseases, weeds, etc.), but it is not easily predictable which intentionally introduced plants will become a problem.
Early detection, monitoring, and control are essential to prevent spread. Avoiding reintroduction is also important by prohibiting the sale of known invasives and educating eager gardeners to refrain from buying those plant species. Butterflybush, Clary Sage, Fennel, and Baby’s Breath are examples of noxious weeds that are often still available to purchase. Many wildflower seed blends also include noxious weeds.
There are two basic types of invasive plants of concern to landscape gardeners: Plants that invade disturbed habitats and plants that invade forests. Common in disturbed habitats are Himalayan and Evergreen Blackberry, Scotch Broom, Gorst, and Japanese Knotweed. In forests, the worst offenders are “the 3 Englishes:” English Ivy, English Holly, and English Laurel—after eating the fruit of these species, birds often transport and deposit the seeds in otherwise pristine wilderness areas!
Manual or mechanical removal (pulling, cutting or mowing), although hard work, is the best method of control. Not long ago I noticed a hillside of blackberries that had obviously been sprayed with an herbicide—this hillside was right across the street from an estuary—I cringed to think of how much of the herbicide ended up in Puget Sound!
Blackberries can be mowed with a brush cutter or you can hire some goats to eat them (goats bred for meat are best; they may, however, eat your favorite garden plants and the bark off of desirable trees!) Japanese Knotweed can be mowed as well—the roots need to be grubbed out for both species, or cover the area with a sturdy landscape cloth to suppress regrowth. Either way, to quote Madeye Moody: “constant vigilance” is needed to totally eradicate them!
I go on “yellow flower patrol” every spring to cut out Scotch Broom. Plants devote a lot of energy into flowering and fruiting—this is the best time for cutting them– before they go to seed! They are also easiest to see when they are in full bloom. If neatness is not a worry, it is best to just leave the cut plant on top of the stubs to suppress new growth. To discourage recolonization of a cleared area by seedlings, amend the soil with biosolids and replant with native shrubs and grasses.
Some people paint the cut stubs of these woody species with an herbicide to prevent resprouting.
For English Ivy, dig out as much as you can. At the very least, cut the vines that are climbing trees. By keeping it close to the ground, you can prevent it from maturing and producing fruit.
Check out the complete list of noxious weeds at the Washington State Noxious Weed Control Board –and then “rally the troops” to eradicate the invaders!
The most common reason for failure in gardens and landscapes is inadequate irrigation (or conversely overwatering). There are many options for irrigation systems from low tech to high tech; from cheap to expensive; and from most wasteful to most efficient. But, however you plan your garden, plants need water! Even native plants and drought-tolerant plants need supplemental irrigation the first few seasons until they are well established.
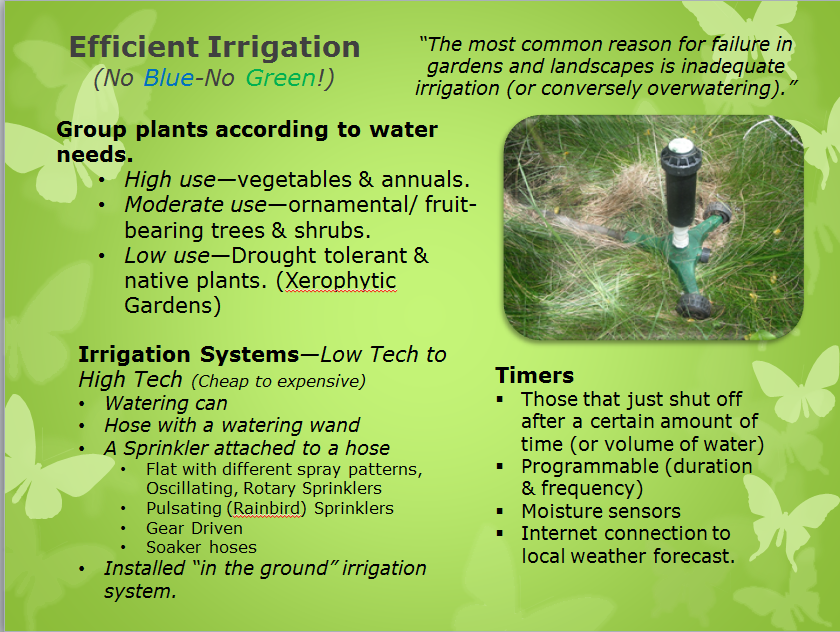 The method or system you choose to employ or install to keep plants alive and healthy will depend on your wallet, your time, and your commitment to water conservation.
The simplest, but most time-consuming and back-breaking method is carrying old-fashioned watering cans or buckets to each seedling, sapling, transplant, or container plant. Although it may not be a preferred method by many, it is a viable option for those who cannot, or do not want to invest in a more expensive system, especially when irrigation is only needed temporarily during the establishment phase of new landscapes. Sometimes trucks or wagons can be adapted with water tanks to bring water to where it is needed.
If you can reach plants with a hose, hand-watering becomes easier. I prefer using a watering wand with just a breaker at the end which allows a maximum volume of water with a gentle shower (not those fancy nozzles with variable spray patterns!). With a wand, you can also often avoid getting water on flowers and leaves, applying water directly to the soil where it is needed. Not only is this irrigation method soothing and pleasurable, it allows a person to take the time to inspect and enjoy each plant and to vary the amount of water according to each one’s needs.
A sprinkler attached to a hose is the next low tech option. Several different styles are available. The simplest type force water through holes in the top and are available in different spray patterns. Oscillating sprinklers water larger rectangular areas by forcing water through holes in an arm creating a fan-shaped curtain; which then oscillates from nearly horizontal on one side, to vertical, to nearly horizontal on the other side, depending on the adjustment. Rotary sprinklers similarly use the pressure of the water to spray a circular pattern. Some decorative sprinklers add a bit of whimsy to the landscape. All of these sprinklers can easily be moved to where they are needed. Travelling sprinklers that move on their own are also available for lawns.
Pulsating sprinklers or “Rainbirds” can apply a large volume of water very quickly and their spray pattern is easily adjusted. Although they are often sold on spikes, they are best mounted on a wide base, because as the soil becomes soft and moist, the force of the pulsating action causes them to tip over. Newer gear-driven sprinkler heads work similarly without the jarring pulsating action.
Timers may be purchased which vary from the simplest, which must be started manually but allow you to set a time period after which it will shut off; to more expensive programmable models that allow you to set start and stop times over several days.
The problem with sprinklers, however, is that a lot of water is often wasted, either due to overspray or evaporation loss. Soaker hoses are another low tech option. Most are made from rubber, but can be made of different porous materials, they allow water to ooze or slowly drip to the ground where it is needed.
Installing an automatic in-ground irrigation system requires a bigger investment, but is great for people with limited time. The best systems have moisture sensors so they will not turn on at their appointed time if it has rained or is raining.
(This article was first published in the Peninsula Gateway on June, 15, 2011)
Once you have your vegetable garden and annual flowers planted, all that’s left is to keep them growing healthy and beautiful through the summer. Along with irrigation, you may want to add additional fertilizer. As a professional horticulturist, this is probably what I neglect the most in my home gardens. Because I make sure to start with fertile soil, my plants usually don’t need additional fertilizer for several weeks. “The key to successful flowers and vegetables in your organic garden is healthy soil first, organic fertilizer second.”
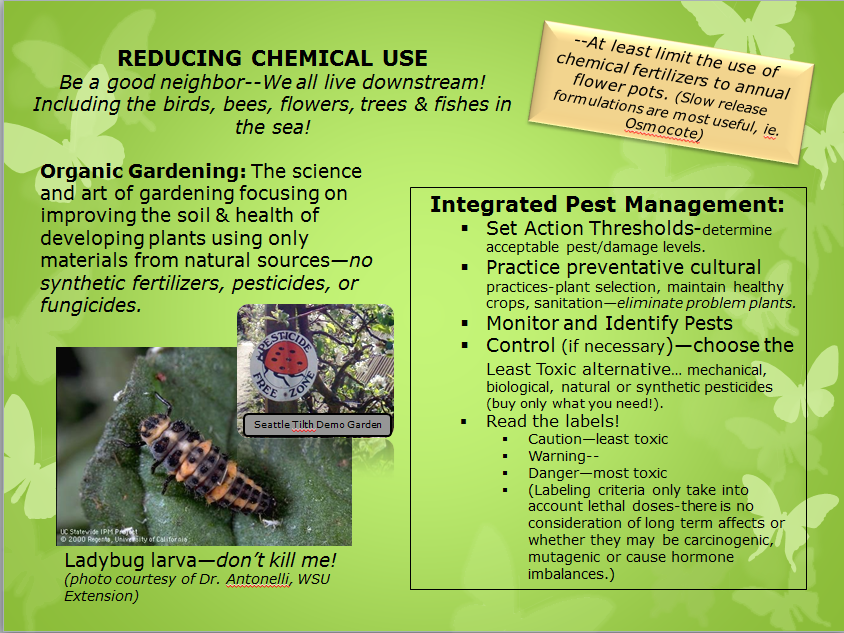
Organic Gardening is defined as “gardening with fertilizers consisting only of naturally occurring animal and/or plant material, with no use of man-made chemicals or pesticides.” Although I am not a strict organic gardener, I try to use natural products as much as possible. Many chemical fertilizers are petroleum-based—and are getting more expensive as oil prices increase. I still sometimes use slow-release formulas, such as Osmocote, for my potted plants because soil nutrients are quickly depleted in containers.
The nutrient analysis (3 numbers) listed on a fertilizer package is the percentage of each macronutrient: Nitrogen : Phosphorus : potassium(K) contained within that formulation. Occasionally deficiencies of the micronutrients, Iron, Boron, or Magnesium occur; but these deficiencies may be due to improper pH.
Excluding incorporation into soils prior to planting, there are two ways to add fertilizers to established plants: Top-dressing on the top of the soil with granular products or liquid-feeding.
Examples of organic fertilizers for top-dressing are: mostly nitrogen: blood, feather, fish, soybean, cottonseed, crab, shrimp, or alfalfa meal, pelleted biosolids, and bat guano; mostly phosphorus: fish or mammal bone meal or rock phosphate; mostly potassium or other trace minerals: sunflower seed hulls, wood ashes, granite dust, greensand, kelp meal, and azomite.
Fast-growing annuals and vegetables may benefit from “foliar feeding” with a liquid fertilizer. It is well documented that many plants will absorb nutrients through their leaves. Early morning or late evening is the best time to apply liquid fertilizers such as seaweed extract, compost tea, or liquid fish fertilizer. Liquid fertilizers may be applied as a spray or injected into the irrigation system using a siphon (a simplified form is the “Miracle-gro” bottle attached to your hose). Many gardeners apply fertilizer once-a-week, but application every-other-week should be sufficient. I, personally, don’t do much supplemental feeding, but then, I never can grow the huge pumpkins that many hobby gardeners proudly produce!
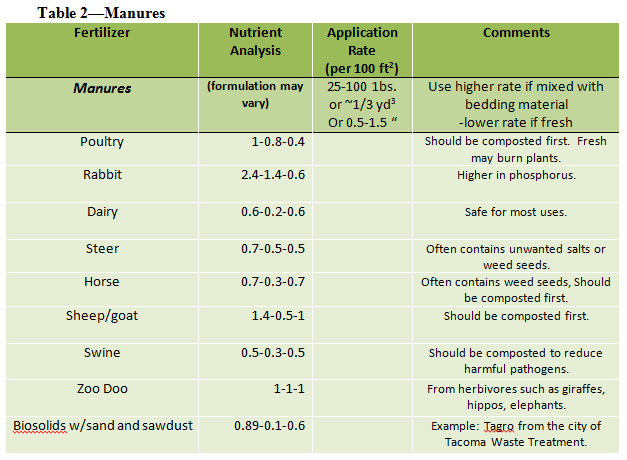
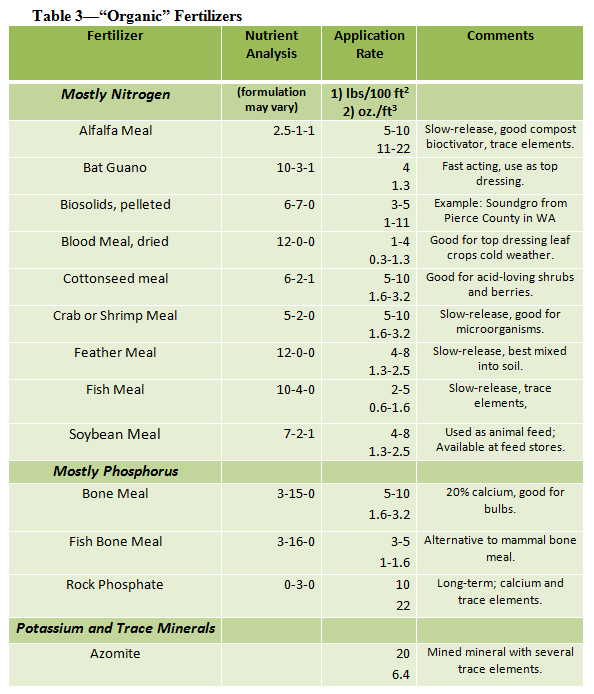 Table 2 and 3 lists some common organic fertilizers. When you select fertilizers, you should use what is available in your area and is most economical. Follow recommended fertilizer application rates– more is not better and could harm plants or just be washed away to pollute watersheds! This is especially true for liquid fertilizers. Beware of gimmicks—you should know what a product contains and what its benefits are to the soil and plants. Also many “organic” fertilizers, although from natural sources may not be all that “green,” depending on how they were collected. Some minerals are mined. Animal and plant products may have been subject to genetic engineering, pesticide-use, inhumane “factory-farming,” or over-harvesting of wild populations.
Organic fertilizers benefit the soil’s microfauna; the worms and other organisms that work together decomposing organic matter. They improve the soil by making biodegradable nutrients available again to plants. Chemical fertilizers can kill beneficial soil microorganisms.
Many gardeners will swear by certain products and are reluctant to change their practices, but just as we may need to adapt and find other energy sources, we should be willing to try different fertilizers as cost and availability change and we increase our knowledge of their effect on our environment.
(This article was first published in the Peninsula Gateway on July 7, 2010.)
My husband helps a friend prune his trees 2-3 times a year. The friend’s neighbor threatens to sue when the trees start blocking his view of Gig Harbor. It amazes me that people are so worried about being able to see water but do not care when their view is framed by ugly trees! Luckily our friend’s trees are mostly Japanese Maples that naturally do not grow very big. But as the trees age, it gets more and more difficult to keep them from growing taller without totally disfiguring them.
Most trees do not need to be pruned— gardeners and landscapers, looking for something to do in the winter often resort to needlessly butchering trees. There are legitimate reasons for pruning; including cutting out crossing, rubbing or diseased branches and balancing out the crown. It is also helpful to thin out branches to increase light penetration to the interior of fruit trees. Pruning may help correct deformities due to previous damage or poor pruning practices.
Not only can bad pruning jobs be unnecessary or unsightly, they can create dangerous situations in the future. New growth after a pruning cut is often more weakly attached to the main stem and as it grows bigger and heavier it may break and cause serious injury or damage. This is especially true for conifers that grow with a central leader– they should never be topped. It is also true for “water sprouts” that appear after a large limb of deciduous tree is cut.
If you decide that pruning is necessary, only make thinning cuts—cut off an entire branch all the way back to the next biggest branch; avoid leaving stubs. On large limbs, make the first cut on the underside of the limb several inches away from the trunk. This helps to protect the tree from damage as gravity acts upon the heavy limb when making the final cut. For the final cut, do not cut flush with the trunk but slightly away from the trunk just beyond the slight swelling we call the “branch collar.” Do not apply any product to the wound; it heals best when left open to the air.
For big trees, consult an ISA (International Society of Arboriculture) certified arborist. They can evaluate the health and potential danger of trees and make appropriate recommendations.
If you are “limbing up” a tree, be conscious of balance—never remove more than 1/3 of the crown. Personally, I love seeing branches of trees like the Western Red Cedar swooping all the way to the ground!
The best season for pruning, is the one that allows the plant the most time to recover. Spring bloomers are best pruned after they bloom (or fruit). Plants that bloom later in the summer can be pruned in winter. — The beauty of a flowering tree is severely diminished when all the flower buds have been cut away before it blooms—a common sight in many commercial landscapes!
“Edward Scissorhands” wannabes need to understand that horticultural techniques such as topiary and bonsai require specialized knowledge, constant attention and decades to create. It may be wiser to withhold the snipping and find a non-living subject for your artistic endeavors!
If pruning is a constant battle, whether because of height, past pruning mistakes, or functional reasons, such as encroachment on paths and roads; and if the pruning severely impacts the health or aesthetics of the trees or shrubs, it is better to remove them entirely and replace them with something more appropriate. –Redesigning your landscape may be the best solution!
(This article was first published in the Peninsula Gateway on March 24, 2010.)
I hate having to throw anything away. I recycle everything that is allowable in the co-mingling recycling bin and save up anything else that can be dropped off at a convenient location. I try to buy only what my family will use, but inevitably food spoils and must be discarded. I feel not so wasteful when I feed kitchen scraps to my chickens or my worms.
A “chicken tractor” is a portable chicken coop, designed to put chickens to work weeding and fertilizing areas of your garden. The best part is you get fresh eggs (and meat, if desired)—no roosters needed! Hens are easy to care for; they can be given food scraps such as stale bread and cereals, vegetables and fruits (they won’t eat rinds); they eat cheese too; and recycle eggshells! You should buy “layer crumble (or pellet)” for supplemental feed. And of course, make sure they have fresh water. The disadvantage of having chickens is that they are messy; like all birds, they poop everywhere. If you don’t want poopy eggs, you need to clean out nest boxes frequently and put in fresh bedding. Animal manure attracts flies; moving the chickens frequently reduces manure build up. After you move your chicken tractor the area can be tilled, raked out and prepared for planting. Chickens don’t discriminate between weeds and your prize plants—so keep them away from plants you don’t want eaten or the soil scratched up around. Your chicken tractor also needs to be predator proof. I never know for sure what gets our chickens at night— a chicken can be dragged through a hole as small as a softball and all that’s left the next day are some feathers! You may think a pastoral scene of wandering chickens would be picturesque, but unpenned chickens aren’t safe and are likely to eat or tear up your garden plants.
I inherited a “Can-o-Worms” worm composter from a neighbor. The Can-o-Worms is convenient because you can separate the finished, older compost more easily and drain away the “compost tea” (which can be used to water plants). To be a successful worm wrangler, you just need to make sure you don’t layer in the food scraps too thickly. You need to maintain the right balance of moisture and aeration. Worms can be purchased, or get them from a friend or a local organization. Start by placing worms in a bed of compost (or coconut fiber). Add a layer of food scraps and cover with moistened, shredded (non-colored) newspaper (or fallen leaves). Continue layering food scraps and newspaper in the following days and weeks until layer is full; then start again in the next section allowing worms to migrate up from the older section to the new. Worms love vegetable scraps and fruit rinds — especially melons! I like the fragrance of orange peels. Almost any plant product can be put into a worm bin: coffee grounds, tea bags, dryer lint (from natural fibers), sunflower and nut shells. . . as long as you don’t load up too much green or wet material and woody material is small. Leftover tomato, melon and other seeds often sprout in soil made from worm compost. The biggest drawback is that annoying fruit flies are attracted to the bin.
Between my chickens and my worms the only kitchen scraps that I throw out are: 1) meat and fish bones and scraps; 2) some dairy products; and 3) fats and grease. (I even use old cooking oil for making laundry soap —or my husband uses it instead of diesel!).
(This article was first published in the Peninsula Gateway on February 10, 2010.)
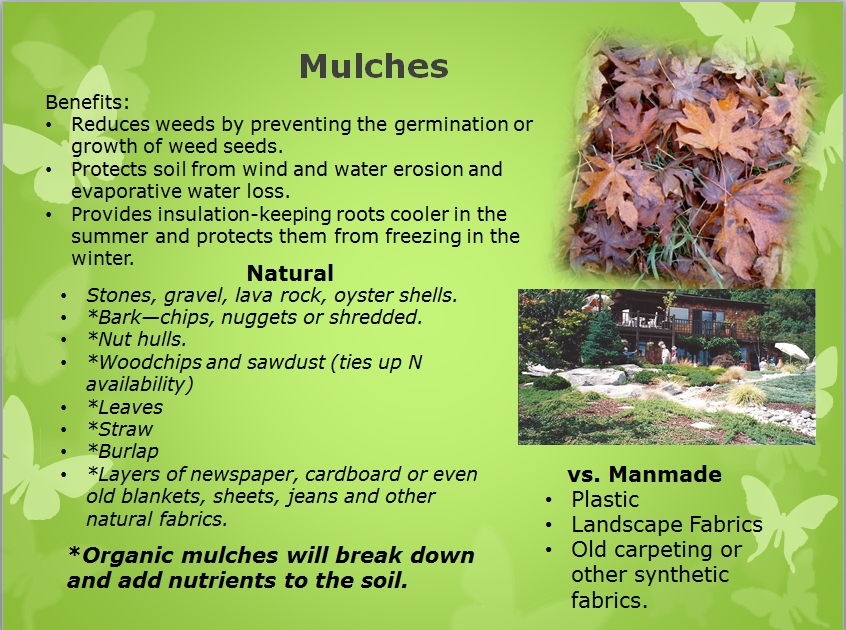 Mulch is anything that covers the ground around your plants. The benefits of using mulch are numerous. Most importantly, it can mean less work for you in the future!
Mulch helps to reduce weeds by preventing the germination or growth of weed seeds. (Some seeds that blow onto the top of the mulch, such as Hairy Bittercress, however, are perfectly happy growing in pure bark.)
Mulch protects soil from wind and water erosion and evaporative water loss. It provides insulation keeping roots cooler in the summer and protects them from freezing in the winter.
Mulch comes in two basic types: natural, organic mulches or man-made mulches such as landscape fabrics, plastics, carpeting, etc.
Landscape fabrics come in two types: a papery, fibrous sheet or a fine plastic mesh. Both are designed to allow water to penetrate and are long-lasting. Any that I’ve used or encountered in the landscape, I ultimately end up cursing! Some weeds, such as grasses, still grow up through them and are even harder to remove. Shrubs, such as heaths that grow in width by rooting of lower branches cannot properly expand. Replanting or removing plants is more difficult. Longevity is their drawback—they are not a good choice for an evolving landscape.
Plastic is used for temporary purposes. Black plastic does not allow water to penetrate, but can be used to warm the soil for early planting and helps to prevent weeds, but it should be remembered that some weed seeds can live in the soil for several years. I had an area covered for two years and still had a bumper crop of weeds after the soil was tilled. After using plastic, you still have the problem of disposing of it.
If you have carpeting that would go to the dump otherwise, use it to help control weeds in your vegetable garden—just lay it out and cut holes for the plants.
Stones, gravel, lava rock are not really organic, but are natural. Many people like the look of a dry riverbed, but weeds can still sprout in crevices where soil has collected. Stones are a heat sink and can be used around plants that benefit from the warmth given off during the night after a sunny day.
Organic mulches are all derived from living organisms. As they break down, they improve the soil by providing nutrients and organic matter.
Bark—chips, nuggets or shredded is the favorite here in the northwest. It is attractive and relatively inexpensive. Woodchips and sawdust can also be used but may tie up nitrogen, making less available to plants.
Leaves: I always try to encourage neatniks to leave fallen leaves in their shrub beds, at least over winter. The layer of leaves suppresses weeds, protects the soil, and adds humus to the soil if allowed to remain.
Straw is relatively inexpensive and is often used as a temporary mulch but can sometimes contain seeds—you sometimes end up growing wheat!
Layers of newspaper, cardboard or even old blankets, jeans and other fabrics (preferably natural) can be spread out under other mulches to add an extra barrier for weed suppression.
Burlap or specially designed mats are good for preventing erosion on steep hillsides.
Be creative! If you have access to any other types of organic matter such as nut hulls or other waste products—try them! Just be aware that very green material such as grass clippings or seaweed should be incorporated into the soil or mixed with woodier material or else they get slimy and stinky.
(This article was first published in the Peninsula Gateway on September 30, 2009)
Silent Spring, that’s what Rachel Carson titled her 1962 book that investigated the disappearance of neighborhood songbirds. Her expose linking the use of chemical pesticides to the decline of wildlife species, spurred the environmental movement of the sixties.
We often hear of environmental disasters caused by big companies. But, many people do not think about how their own actions may contribute to the level of toxic chemicals in our environment. It is important to realize that “we all live upstream” and chemicals we use may combine and become more concentrated and affect those that live further downstream. Many of our waterways, such as the Hood Canal, are extremely sensitive because of the slow rate at which the water is exchanged and ultimately diluted in larger bodies of water such as the Pacific Ocean.
 Gardeners use various types of chemicals in their yards. Pesticides include insecticides, fungicides, herbicides, rodenticides, and slug baits. Petroleum-based chemical fertilizers, although generally not as toxic as pesticides, can cause severe problems in lakes, rivers and bays, encouraging algal blooms and limiting the amount of oxygen for fish and other animals.
The best way to avoid using pesticides is to grow plants that are not as susceptible to insect damage and disease. I curse my apple trees because all I ever get are scabby, wormy apples. On the other hand, I love my plum tree and blueberry bushes. They produce bountiful crops with little care! If you grow troublesome species such as apples or roses, try to select varieties that are disease resistant. If a plant becomes too much of a problem it is better to be ruthless with the plant and replace it with something else than to spend the time and money on chemicals to kill its pests.
Make sure you diagnose plant problems correctly. Don’t be in a rush to spray at the first sign of a “bug” or a little nibbling. Try to tolerate a little damage. The problem may take care of itself naturally. Be able to recognize beneficial organisms such a ladybug larva.
Baits are preferable to spraying because they limit exposure to nontarget organisms. If you decide to spray, use the least toxic alternative. Read the Label! Chemicals labeled Danger are highly toxic, Warning means moderately toxic, and Caution means mildly toxic. These warnings, however, will not tell you if it is carcinogenic or mutagenic, only how many lab animals it killed in testing. Only buy the amount you need, following the recommended application rates, at the proper time– no matter how desperate you are to eradicate the pest! Avoid “double-duty” products such as “weed & feeds.” Also, just because a product is from a natural source does not mean it is safe, although it may be less persistent in the environment.
I rarely use any chemicals in my yard any more. My resident garter snake population takes care of most of my slugs. In my gardens, I use only Tagro, compost, and organic fertilizers. The use of slow-release chemical fertilizers is limited to my container plants. I do, however, spray my foundation when necessary to discourage Carpenter Ants from eating my house. Weeds present the biggest challenge to avoiding chemical use. Planting groundcovers and mulching discourage some but there are always plenty of weeds that need to be pulled!
Reducing chemical use in the garden requires tolerance of some other organisms—such as insects and weeds. Maybe, eventually, you can convince your neighbor that, to save our planet, it’s not so important to have a perfect, weed-free lawn!
(This article was first published in the Peninsula Gateway on Apr 15, 2009 as Is there Chemical Warfare in your yard?”
Buying plants on impulse or over-ordering seeds is hard to resist for an avid gardener. You should have a location in mind before purchasing and make sure the soil is prepared in the selected location before planting. It is much easier to start with a good soil than trying to amend it after planting!
Most trees and shrubs require little preparation as long as the soil is well drained and topsoil hasn’t been removed due to construction activities. If you have a drainage problem, you may create a berm (a hill) to raise the soil level or select plants tolerant of “wet-feet.” Evergreen shrubs such as rhododendrons and heathers need organic matter incorporated into the garden bed prior to planting.
Use soil that was dug out of the hole for backfilling. Nicer soil placed in the hole discourages the plant’s roots from growing into surrounding soil and may cause problems in water movement. Top-dress with fertilizer and mulch after planting. Don’t forget to water!
Herbaceous flowers, herbs and vegetables are fussier. You need soil with a proper balance of moisture retention and drainage as well as the ability to hold nutrients. Sandy soils drain too quickly and will not retain nutrients. Clay particles are good at holding nutrients but a clay soil won’t drain. Loam, with a mixture of particle sizes, is ideal. Moisture and nutrient retention is also improved by the addition of organic matter. One example is coconut fiber (coir); it is the “green” alternative to peat (which is mined out of ancient bogs).
It is often difficult to be sure that soil you buy will be of good quality. Soil companies sell soil as 3-way or 5-way mixes, however there is no standard as to what goes into these mixes. Usually they contain loam, compost, peat, sand, bark, and/or sawdust, (sometimes weed seeds!). Before ordering, visit the company to see samples. Bagged soil also varies in quality; I always look for broken bags so I can inspect the actual soil before I purchase a bag as well as read the label to determine the actual soil constituents.
Table 1 shows examples of various potting soil recipes. Many growers use two or three different recipes; one for nursery stock (woody plants), another for growing bedding plants (herbaceous flowers, herbs, vegetables, and house plants), and perhaps a third for germinating seeds. I purposely omit the chemical fertilizers in an attempt to encourage the use of fertilizers from natural sources.
I usually mix my own soil. Even if I buy it, I amend it with my own worm compost, biosolid products from local waste treatment plants, other “organic” fertilizers and sometimes perlite. Tagro is produced by the Portland Avenue sewage treatment plant in Tacoma. Made from biosolids, sawdust and sand, it is free if you shovel your own. For a minimal cost you can have it dumped into a truck or trailer, or have it delivered. I believe it is the highest and best use of this material–and it grows big beautiful plants! Often I will simply mix Tagro and fine bark mulch in my raised garden beds. You can also purchase premixed potting soil.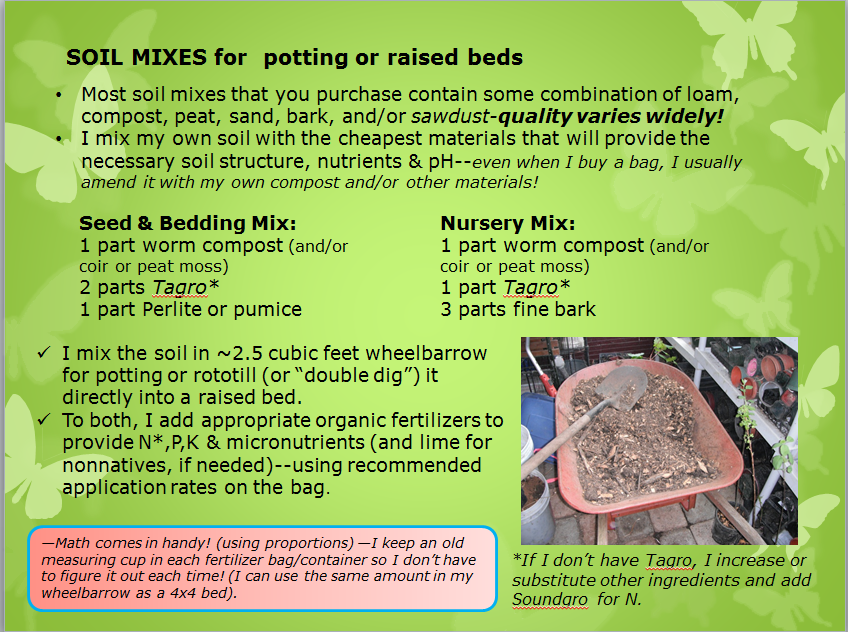
It is a good idea to test your soil, especially for pH—we usually have acid soils. Test kits list recommended pH ranges for various crops and will tell you how to calculate the amount of amendments, such as lime, that should be added to your bed.
“Soundgro” is a granular fertilizer produced by Pierce County’s Chamber’s Creek treatment plant—I use this for nitrogen when I don’t use Tagro. I have used rock phosphate for Phosphorus, greensand for potassium (K) and kelp meal for micronutrients. Follow recommended application rates– more is not always better! Cedar Grove Compost is also a good product made from recycled yard waste in the greater Seattle area. Look for other recycled waste materials in your area. These soil amendments are usually a cheap alternative to chemical fertilizers.
When you start with a good, nutrient-rich soil, it is easier to grow healthy vegetables, flowers and landscapes!
(This article was first published in the Peninsula Gateway on Jan. 20, 2010)