How to Plant Native Plants
Before you Plant
Make sure the plants you have selected are appropriate for the site you are preparing. Take into consideration how large the plants will get and whether they prefer sun or shade; moist or dry soils. Drainage problems should be corrected or plants chosen that are adapted to soggy sites. If selecting plants from outside your area make sure they will thrive in your climate zone. Consider the amount of maintenance the plants will require. Avoid plants known to be susceptible to insects or disease (or increase your level of tolerance for damage). Fall and winter are the best seasons for planting, but planting can be done year-round as long as plants are irrigated sufficiently. Irrigation, especially during the summer, is necessary until plants are well established. Pruning requirements should be minimal if plants are selected wisely. Natural branching patterns are the most attractive! Ideally, native plants will ultimately require little or no care in their recreated natural habitat.
Soil Preparation
Most native trees and shrubs can be planted into the native soil with no site preparation. Some shrubs, especially rhododendrons and other broadleaved evergreens, benefit from the incorporation of organic matter (at least 6 inches deep) into the soil prior to planting. Compost, Tagro, fine bark, and animal manures are examples of organic materials that can be rototilled into the bed before planting. If a rototiller is not available, organic matter may be incorporated into small areas using the double digging method, where a spade is used to mix soil amendments into the existing soil by systematically turning the soil and amendment together, shovelful by shovelful over the entire area. Herbaceous perennials and annuals, especially those found in the forest understory, will benefit from a similarly prepared planting bed. Note, when amending the soil, the whole area needs to be improved, not just the hole in which you plant the plant.
Finalization of the Design
Set the plants into the places where you plan to put them. You can make changes, even if you are following a plan made by a professional. When landscape designing, nothing helps more than actually seeing the plants in place! Stand back and look from different perspectives. Use the principles of design such as scale, form, texture, color, focus, and balance to envision the most attractive arrangement of the plants in your overall design within the surrounding area. Try to visualize how your landscape will look in different seasons and in years to come. Make sure you space the plants allowing for growth. Adjust the placement of the plants until you are satisfied with the aesthetic appearance of your design.
Digging the Holes and Preparing Root Ball
Move the plant out of the way in order to dig the hole. Dig a hole at least twice the diameter and just as deep as the root ball. Pop the plant out of the pot. Any circling roots must be cut and/or spread to prevent the plant from girdling itself in the future and to hasten root growth into the soil of its new location. If the root ball is only lightly rooted, the roots may be gently massaged or spread out with your hands, or fingers. Plants with a fair amount of circling roots, with some soil still visible, can be slashed with six to eight vertical cuts using an old hand shears, knife or shovel.
If the roots are totally matted on the outside of the root ball and no soil is visible, it is beneficial to shave away all the matted roots from the sides and bottom of the root ball with a knife. If there are large circling roots they need to be cut away with a hand pruner or lopper and/or spread out so new root growth expands out away from the plant.
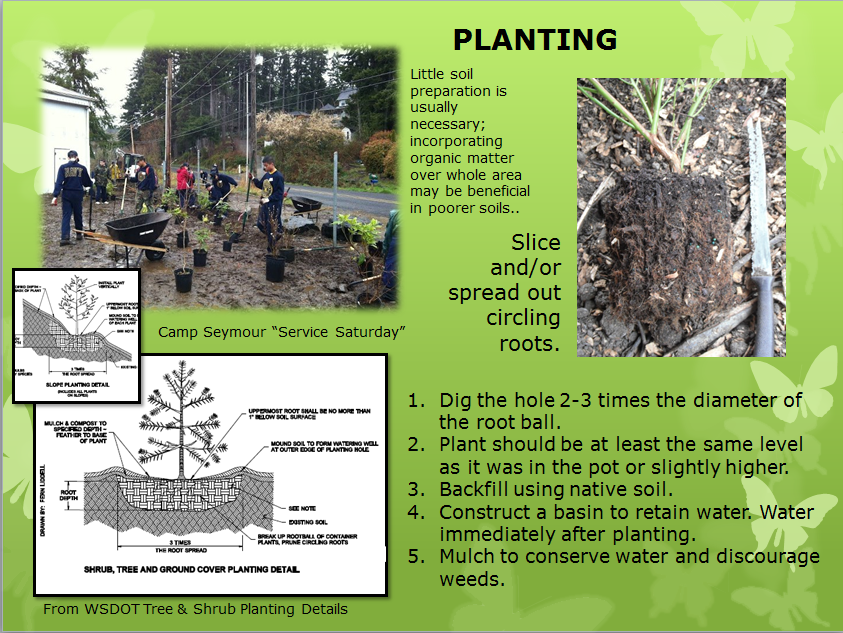 Planting
Place the prepared root ball into the hole. Adjust the depth of the hole by digging deeper or replacing soil until the plant will be at the same soil level or a little higher than it was originally growing. Planting too deep may cause problems relating to air exchange with roots and/or disease problems when too much moisture is kept in contact with the stem. Back fill with native soil. Backfilling with other soil amendments may create a constantly wet condition leading to root rots or it may inhibit roots from leaving the nicer soil with the result of containerizing the plant, leading again to circling roots and stunted growth. You want the new roots to grow into native soil and become established in its new location as soon as possible. Tamp the soil lightly, making sure any large air pockets are filled. Use extra soil to create a basin around the plant to facilitate water penetration into the soil.
After Planting
Plants should always be watered in as soon as possible after planting to settle the soil and eliminate any air pockets. Mulching with organic mulch (bark, straw, leaves etc.) helps to keep in moisture, prevents erosion, and discourages weeds. Planting spreading groundcovers, although expensive initially, will save you a lot of future labor by out-competing weeds once they have grown to fill in the area. Pruning should only be done to remove dead, diseased, or rubbing branches, or to balance out the canopy. Cuts should always be made to the next biggest branch, leave no stubs! Remember, Topping is for desserts not for trees. Fertilization may help newly planted trees and shrubs, but should be done sparingly. Nitrogen is usually the only supplemental nutrient needed by woody plants. Chemical fertilizers are expensive and if over-applied can leach and pollute watersheds. Organic fertilizers are generally safer, but may take a little longer to show results. If the leaves on a plant are light green, yellow or smaller than normal, application of nitrogen may be indicated. The best time to fertilize is just after plants begin to grow in the spring. Applications may be made in late fall, late winter and early spring but some loss of nitrogen may occur. Do not use fertilizers containing herbicides. Subsequent irrigation of new transplants is necessary whenever sufficient rainfall is absent for several days not just in the summer, (July and August are the driest months in the Northwest. ) Lastly, enjoy the beauty of your plants in your naturalized landscape and any wildlife that may visit the new habitat you have created!
Staking
Staking is only necessary if the plant cannot stand by itself or it is likely to blow over in strong winds. Evergreens or deciduous trees with a large canopy are most at risk. Drive two stakes into firm ground and tie the stakes with nonchafing material. Inspect frequently. Stakes should be removed when the root system is firmly anchored, usually after one growing season.